The easiest way to query a single package or group is to use the query option from the icon's context sensitive menu. If you want to query a more diverse set of packages, select them all and use the Query button in one of the windows.
Using either of these methods creates a window like the one shown in figure 104. If you choose only one package, it will look a bit different however, so some of this won't apply.
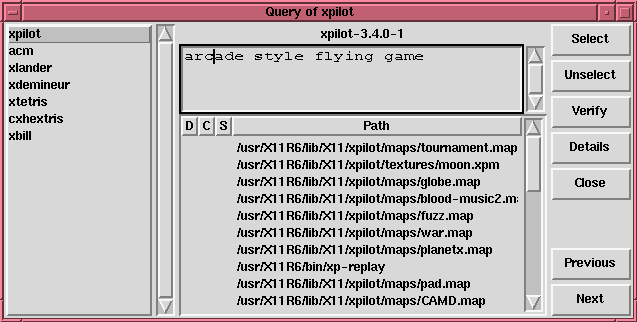
On the very left of the window is a list of the packages that have been queried. Selecting one of them will change the information in the rest of the window. You may step through them in order by using the Next and Previous buttons on the right side of the window.
The name, version, and release of the current package are in the top middle of the query window. Immediately below this is the description of the package, which can be quite large. A scroll bar is there to let you read the whole thing.
Below the description is a list of the files contained in the package. Along with the full path to the file, the file list tells you a couple of other things. If a D appears to the left of the path, that file is a documentation file and would be a good thing to read. If a C appears there, then the file is a configuration file. A * means that the correct version of that file is not installed on your system. This can occur because a more recent version of a package was installed or because two packages contain different versions of the same file.
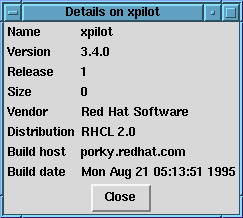
More information on a package can be seen by clicking on the Details pushbutton. A window like the one in figure 105 will then appear. This lists more information about the package being displayed in the main query window. When you select a new package in the query window, the information in the details window will change to reflect your new choice.
You may also select, unselect, or verify a package while querying it by using the buttons provided. Click on the Close button when you are finished looking at the packages.
Verifying a package checks all of the files in the package to insure they match the ones present on your system. The checksum, file size, permissions, and owner attributes are all checked against the database. This check can be used when you suspect that one of programs files has become corrupted due to the installation of new programs.
Choosing the packages to verify is the same as choosing the packages to query. Select the packages and use the Verify button or choose the Verify entry from a context sensitive menu. A window opens like the one in figure 106.
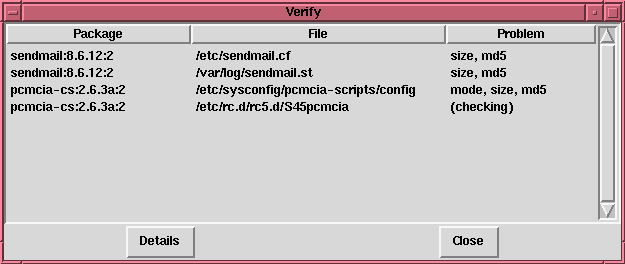
The three columns in this window describe the package with a problem in it, the file that has the problem, and a brief description of the discrepancies that were found. While the check is running, the current file being checked appears as the last element in the list, and the problem is listed as (checking). A full list of the problems that can be found through verification appears in figure 107.
| Problem | Description |
| missing | The file is no longer on your system |
| mode | permission bits have changed |
| size | file's size has changed |
| uid | owner's uid has changed |
| gid | owner's gid has changed |
| md5 | the md5 checksum has changed |
| link | the file is a symlink to the wrong place |
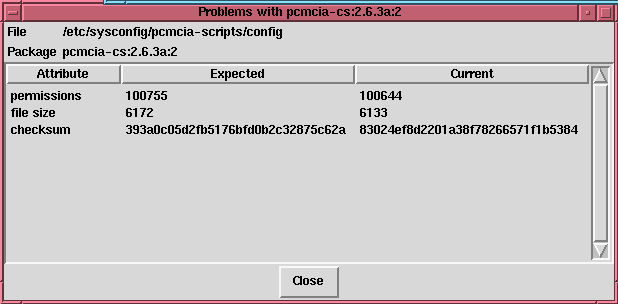
To get more information on the problems found with a file, double click on the file's path. A window like the one shown in figure 108 lists the expected and current values of the attributes that are amiss.
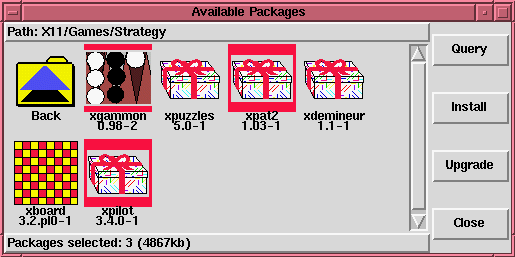
Installing new packages from glint is very simple. First look at the packages available for installation (see the section 10.2.3 for how to do this). You may select any number of these (and query them if you're not sure what they are) for installation (in the same manner you select packages for verification.) If you want to install a single package or group, the context sensitive menus provide a shortcut for doing so. Figure 109 shows a window with some packages selected for installation.
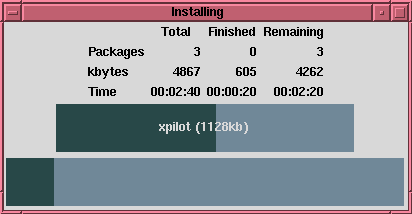
After you've begun the installation, a window appears like the one in figure 110. It tracks the progress of the installation so you'll know something is happening. The top bar shows how much of the current package (whose name is listed inside of it) has been installed while the bottom graph shows how much of the total installation has been finished. The number of packages, package sizes, and time estimates are continually updated.
If a problem occurs during the installation, a window will appear listing any errors that occurred. If this happens, you should correct the problems and then try again.
After the installation has completed, the package and groups that have been installed are moved from the available window to the main glint window to show you that they have been successfully installed.
When a new version of a package has been released, it is easy to install it on your system. Select the packages from the window of available packages in the same way you select packages for installation. Both the Upgrade button and the context sensitive menus will begin the upgrade.
During the upgrade, you'll see a progress indicator like the one for installing packages. When it's finished, the installed packages will appear in the the main glint windows and any old versions of the packages will be removed.
It is much better to use the upgrade option than to uninstall the old versions of a package and then install the new one. Using upgrade ensures that any changes you made to package configuration files get preserved properly, while doing it manually could cause those changes to be lost.
If you run out of disk space during an installation, the install will fail. However, the package which was being installed when the error occurred may leave some files around. To clean this up, reinstall the package after you've made more disk space available.
Uninstalling a package is not the same as upgrading one. When a package is uninstalled, any files it uses that are not needed by other packages on your system are removed. Changed configuration files are copied to <filename>.rpmsave so you can reuse them later.
Like verifying and querying packages, you can remove a package through the buttons on the right of the glint window or through a context sensitive menu. Remember that when you make a choice from a group's menu, the operation is performed on all of the packages in that group, so be careful!
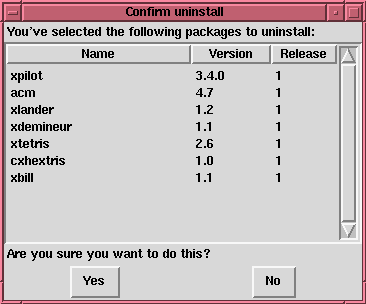
Once you've begun the uninstall, glint asks for confirmation, showing a window like the one in figure 111. All of the packages that are about to be uninstalled are listed. You should look at them all to ensure you're not about to remove something you want to keep. Clicking the Yes button will start the uninstallation process. After it completes, the packages and groups that have been removed will disappear from any windows they were in.