Chapter 10. Working with Images
There are several types of image files. Some images are created using sophisticated software packages, while others are made from digital cameras and scanners. You may have downloaded some of these image files from the Internet or received them in an email. You may also want to create your own images to send to others. You can view and manipulate the most common types of image files using the many applications included in Red Hat Linux.
Viewing Images
This section discusses some of the common tools for viewing image files. Certain tools available are specialized applications with several functions that enhance your image viewing experience; while others are general-purpose browsers that have some image viewing functionality.
Using Nautilus to view Images
Nautilus is a general-purpose file manager and browser for the GNOME desktop environment. Nautilus has many functions beyond simple image viewing; however, for this section, we will use it for basic image browsing. For more information about Nautilus, see Chapter 2.
Nautilus is known for its ease-of-use,
and it handles images with the same ease as it does for other file
types. To begin browsing your image collection with
Nautilus, double-click on your home desktop
icon:

You will be presented with a view of all the files and folders within your home directory. Double-click the image (or folder containing the image) and Nautilus will open the new file or folder within its browser window. Figure 10-1 shows that Nautilus automatically creates thumbnails of any images in your folders:
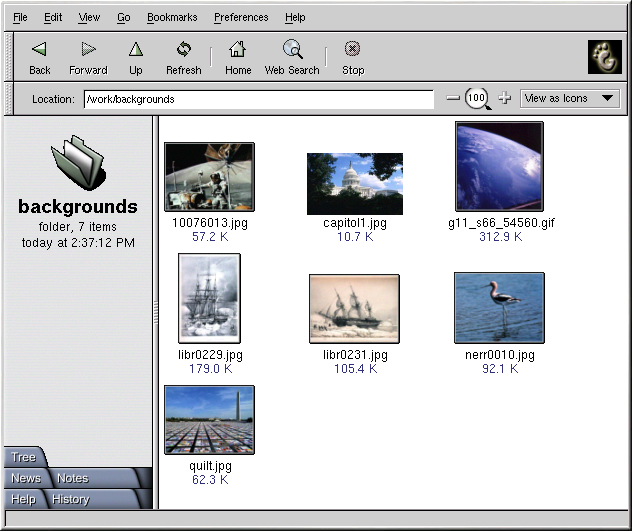
Double-click on any thumbnail icon to view the image in its native size. The image will load within the browser window, along with a thumbnail view and detailed file information along the left panel. Below the file information are advanced options for working with the file. By default, Nautilus offers you the option of opening the file with Electric Eyes, a robust image viewer with more advanced imaging features than Nautilus. You can also open the file with the GIMP, a powerful image manipulation application. More information about using the GIMP can be found in the Section called Manipulating Images with the GIMP.
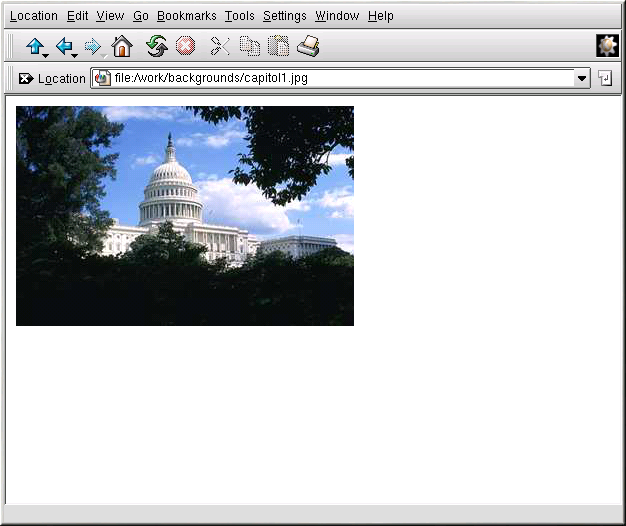
To increase and decrease the size of the viewed image in Nautilus, click on the magnifying glass icon on the location bar as shown in Figure 10-2:

Click the + icon to increase the size of the image or - to decrease it.
Using Konqueror View Images
If you use KDE as your desktop
environment, then you can use the Konqueror
file manager to view images. Simply click on your home directory
desktop icon to access the Konqueror file
manager:

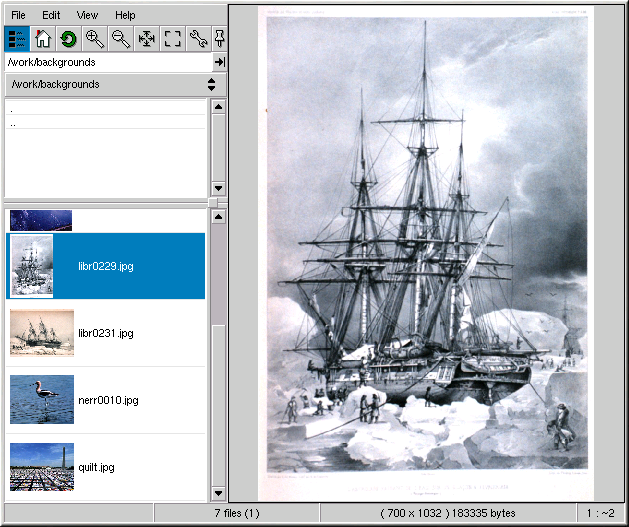
Konqueror works similarly to Nautilus. Image files within a folder are displayed as automatically-generated thumbnail icons within the browser. When you click on a thumbnail icon, the browser displays the image in its native size, as shown in Figure 10-3.
To zoom in and out of images within Konqueror, you first need to change the way it renders the image. From the top toolbar, choose View => View Mode => Image Viewer. This will re-display the image and allow for zooming in and out using the two magnifying glass icons on the toolbar, as shown in Figure 10-4.

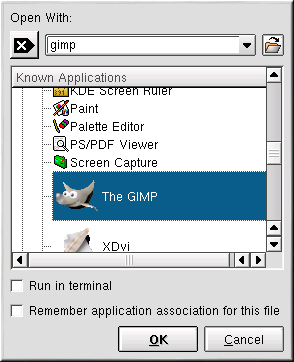
You can also open the image with more advanced image viewers, as well as with the GIMP. Right-click on the image and choose Open With.... A pop-up menu will appear allowing you to open the application you wish to use. To launch the GIMP, choose Graphics and scroll down the list of applications. Click on the GIMP icon and click OK, as seen in Figure 10-5.
Using GQview
GQview is a powerful image viewer for GNOME desktop users that supports several image file formats, including:
JPG/JPEG
GIF
PGM
XPM
PNG
PCX
TIF/TIFF
PPM
BMP
GQview is useful for viewing individual image files as well as browsing collections of files in folders. It supports zoom in and zoom out functions, as well as thumbnail views of all image files within a directory. It also supports several advanced options not found in the simple image viewers listed above.
GQview can be started from the GNOME and KDE panels. Choose Main Menu => Programs => Graphics => GQview to start the application in GNOME. For KDE users, choose Start Application => Programs => Graphics => GQview. If you are at a shell or terminal prompt, start the application by typing gqview. Upon start-up, GQview will browse your user home directory by default. If you have any images in this directory, the gallery panel will automatically generate thumbnails for you to highlight and view in the main display area.
The interface of GQview is simple and straightforward. The toolbar allows you to fit the image to the display window, zoom in and out and toggle between thumbnail view and text-only browser panels. It also has a text field for you to enter a particular path to your image directories. Right-clicking on an image in the display area opens a pop-up menu of image size and other file options such as renaming, moving, copying. You can also hide and unhide the thumbnail file panel and toggle windowed and fullscreen modes within the pop-up menu.
You can also combine functions within
GQview and create a dynamic presentation
effect for groups of images within a directory. In the text field below
the toolbar, type the path to the the directory where your images are
located and highlight the first image in the thumbnail file list panel
on the left. Now press
GQview can also be used to change your desktop wallpaper quickly and easily. Right-click on the image and choose Edit => Set as wallpaper. From the Edit menu, you can also choose to open the file with a number of image editing utilities, including the GIMP, Electric Eyes, Xview, and Xpaint.
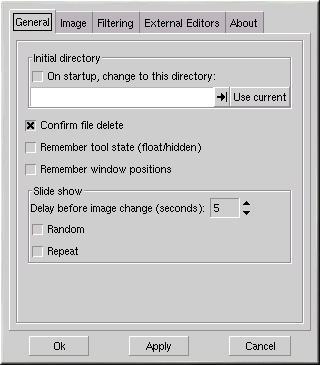
GQview also allows you to customize several
settings by clicking the Configure button:

The configuration pop-up menu allows advanced users to configure several options. You can customize a directory on startup, change thumbnail sizes, and even change the default image editors to manipulate the file if you would like to use one that is not listed.
Electric Eyes
If you want a quick and simple way of viewing one file, Electric Eyes may be for you. To start Electric Eyes from a GNOME desktop, choose Main Menu => Programs => Graphics => Electric Eyes. For KDE users, choose Start Application => Programs => Graphics => Electric Eyes. You can also type ee at a shell prompt. Right-click the Electric Eyes logo to open the pop-up menu and load an image. Right-click on displayed images to configure certain aspects of the image as well as the Electric Eyes environment.
For example, to open the Editing Controls, choose View => Show/Hide Edit Window, and the Editing Control dialog box will pop up, allowing you to change brightness and color saturation levels on the image.
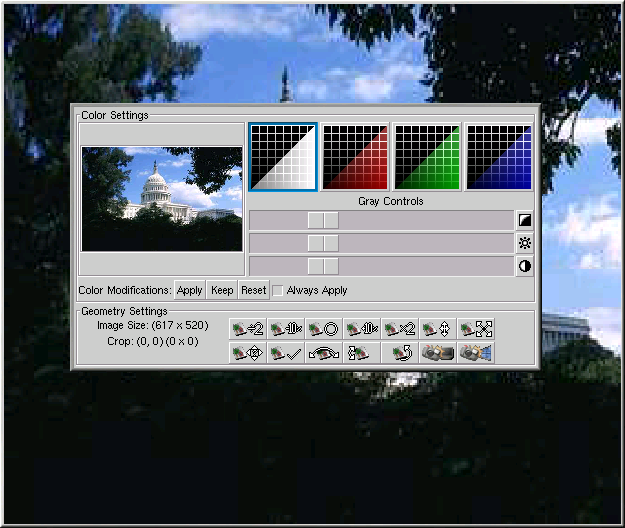
Buttons along the bottom of the Editing Control window let you zoom in and out of an image incrementally by percentage, fit the image to the screen, and even turn the image 90% clockwise, or invert (flip) the image horizontally or vertically. Electric Eyes is an ideal choice for viewing and manipulating single images.